Pain relief
Transcutaneous electrical nerve stimulation (TENS)
Sensory TENS (high-rate TENS)
Used mostly in acute phase of pain or postoperatively
Pain reduction due to spinal gate mechanism
Depolarization results in a tingling sensation
Desirable to avoid muscle contraction
Motor TENS (low-rate TENS)
To treat subacute pain or trigger points
Targets the motor pain modulation theory
Pain relief may be delayed in comparison to that with sensory TENS
Pain relief lasts longer than with sensory TENS
Noxious TENS
Pain relief through central biasing mechanism
Commonly used with point stimulators
Portable TENS
Units are battery operated and can be self-administered
Clinician presets phase duration and pulse rate
Interferential stimulation (IFC)
Used for pain relief, increased circulation, and muscle stimulation
Applies two medium-frequency currents simultaneously
Waveforms of the two are superimposed on each other, which causes interference
Interference creates a “beat” mode
Wedenski’s inhibition—cutaneous nerve inhibition
Sweep frequency—feature available on some units that causes a rhythmical frequency change to reduce accommodation
Uses four electrodes in a quadripolar configuration
Allows for centralized concentration of current
Maximized by electrode placement so that intensity is perceived in area of pain
Can be used with other modalities
Premodulated interferential method easier to set up, but differs slightly
Bipolar electrode configuration
Currents are mixed in the machine, not the tissues
High-voltage stimulation (HVS)
Must be able to transmit a voltage of at least 150 V
Must use a twin-peaked monophasic current
High peak, but low average current provides deep penetration of a comfortable current
Used for pain control, edema reduction, tissue healing, and reduction of muscle spasm
Key feature of this unit is ability to be used with appendage submersion treatments
Muscle reeducation
Neuromuscular electrical stimulation (NMES)
Goal of treatment is to elicit a strong muscle contraction through stimulation of the alpha motor nerve
Can be used to slow disuse atrophy in innervated muscle
Assists neuromuscular function by enhancing force capacity (ability of muscle to contract) versus true “strengthening” of the muscle
Electrically produced contractions cause greater fatigue than physiological contractions
Duty cycle (rest time) must be imposed
Uses of galvanic current
Iontophoresis
Ions in solution are transferred through the intact skin via an electrical potential (like charges are repelled)
Uses DC generator
Most commonly used to suppress inflammation and pain
Treatment guidelines not well defined
Difficult to quantify amount of medication delivered into the tissues
Treatment should be physician prescribed
Safe application requires proper equipment and observation of cautions and contraindications
Direct stimulation of denervated muscle
Can occur secondary to trauma
Upper motor neurons—injury results in permanent paralysis; lower motor neuron is still intact and stimulation can still occur through the nerve
Alpha motor neurons—can regenerate, and active control of muscle can be restored
Electrical stimulation does not reinnervate, but maintains the contractile proteins in the muscle
Microcurrent
Effects and benefits
Evidence is limited
Only application shown to be effective is in treatment of slow-healing skin lesions
Summary
Electrical stimulation that crosses the skin to excite a nerve is considered TENS—transcutaneous electrical nerve stimulation.
Many types of units are available to the clinician, allowing many parameters and waveforms to be manipulated in order to achieve a treatment goal.
The clinical uses of electrical stimulation include pain management, muscle stimulation for alpha motor nerve, stimulation of denervated muscle, iontophoresis, edema reduction, and wound healing.
Electrical stimulation in any form of TENS (sensory, motor, noxious, portable, and interferential) is used primarily for pain relief.
Neuromuscular electrical stimulation (NMES) is used primarily to reeducate muscle contraction of the strengthening muscle.
Iontophoresis is used primarily to decrease inflammation, pain, or both.
Sunday, September 14, 2008
haemophilia
This is the html version of the file http://www.hemophilia.ca/en/pdf/11.0/Pain_ang.PDF.Google automatically generates html versions of documents as we crawl the web.
Page 1
ROADMAP FOR
MANAGING
PAIN
PASSP RT
to well-being
empowering people with bleeding disorders
to maximize their quality of life
Page 2
Roadmap for Managing Pain
The Canadian Hemophilia Society (CHS) exists to improve the quality
of life of persons with hemophilia and other inherited bleeding
disorders and to find a cure.
The CHS consults qualified medical professionals before distributing
any medical information. However, the CHS does not practice
medicine and under no circumstances recommends particular
treatments for specific individuals. In all cases, it is recommended that
individuals consult a physician before pursuing any course of treatment.
The CHS would like to acknowledge those people who contributed to
the development of Roadmap for Managing Pain.
Jenny Aikenhead
Physiotherapist, Alberta Children’s Hospital, Calgary, AB
Maureen Brownlow, RSW
IWK Health Centre, Halifax, NS
Nancy Dower, M.D.
Walter Mackenzie Health Sciences Centre, Edmonton, AB
Sophia Gocan, R.N.
Member, CHS National Programme Committee, Ottawa, ON
Ann Harrington, R.N.
St. Michael’s Hospital, Toronto, ON
Heather Jarman
Pharmacist, St. Joseph’s Health Care, London, ON
D. William C. Johnston, BMedSC, M.D., FRCS(C)
Orthopedic Surgeon and Site Medical Director of the University of
Alberta Hospital, Edmonton, AB
Peter Leung, M.D.
Pain Management Service, St. Michael’s Hospital, Toronto, ON
Pam Wilton, R.N.
Vice-President, Canadian Hemophilia Society
Clare Cecchini
Program Coordinator, Canadian Hemophilia Society
David Page
Blood Safety Coordinator, Canadian Hemophilia Society
Supported by Baxter BioScience
For further information please contact:
Canadian Hemophilia Society
625 President Kennedy Avenue, Suite 505
Montreal, Quebec, H3A 1K2
Tel:
(514) 848-0503
Toll Free: 1-800-668-2686
E-mail:
chs@hemophilia.ca
Website: www.hemophilia.ca
Note: Bleeding disorders affect both men and women.
The use of the masculine in this text refers to both.
ISBN 0-920967-50-7
Page 3
Roadmap for Managing Pain
1
Table of Contents
Introduction ......................................................2
The impact of pain on the family......................2
Pain – the fifth vital sign....................................4
The role of the comprehensive care team in
pain management............................................6
Advocating for better pain management ........7
The use of analgesic..........................................8
Physiotherapy –
another approach to pain management ........9
Orthopedic and surgical management of pain ..11
Complementary and alternative approaches
to pain management ....................................12
Conclusion ......................................................14
Resources ........................................................14
Page 4
2
Roadmap for Managing Pain
INTRODUCTION
“It is difficult to convey how chronic pain totally invades
and affects all aspects of your life. It is a constant
inescapable entity. And it is difficult to make others
understand. Everyone has endured pain, but not the kind
of pain that you must live with 24 hours a day, 7 days a
week, day and night.”
- a 50-year-old man with hemophilia
This eloquent statement was made by a person with
hemophilia interviewed during an informal survey on the
impact of pain.
It reinforces the message that pain experienced by people
with bleeding disorders is not well understood, assessed or
treated. Forty percent of the people interviewed reported
having pain all the time. Children also have pain and often
have difficulty describing the level of their pain. Many adults,
especially those with chronic joint damage, say that pain is
the major element affecting their quality of life. Yet it is only
recently that attention is starting to be paid to this serious
problem.
The most common reasons given for not taking medication
are that…
•
pain isn’t considered bad enough
•
side-effects are a problem
•
access to a pain specialist is difficult.
The goal of this booklet, Roadmap for Managing Pain, is
not to provide all the answers on pain management. Rather,
it is intended as a guide, showing some of the different routes
to take, some of the signposts along the way and, hopefully,
destinations which provide some comfort and relief.
Just as importantly, it aims to encourage open discussion
of pain and to help people realize that suffering in silence is
not the best way to cope.
THE IMPACT OF PAIN ON THE FAMILY
People who live with hemophilia
and other bleeding disorders are
veterans in the acute care of bleeds.
They are, however, strangers in the
uncharted waters of effective pain
management. For many years, pain
has been seen as an unavoidable
part of the condition—something to be suffered, often alone
and in silence.
Often, people are reluctant to complain. They have built
an arsenal of weapons to deal with pain, including doing their
best to ignore it. There are signs, however well a person
hides it, that a person is dealing with pain, for example…
Page 5
3
Roadmap for Managing Pain
•
mood changes
•
a reluctance to communicate and interact
with others
•
increased irritability
•
inability to concentrate
•
difficulty sleeping
•
a decreased interest in favourite activities
•
a lack of appetite.
“My pain has progressed significantly in the last few years.
It has an impact on most aspects of my life. My ability to
climb stairs, walk distances (especially on uneven ground),
type at the computer, hammer a nail and open a jar, to
mention only some examples, have all been affected.
On days when the pain is extreme, it can have a negative
impact on my mood and it affects those around me.”
– a 35-year-old man with hemophilia
In the longer term, ineffective pain management may lead to…
•
missing school or work
•
missing out on social and family activities
•
feelings of futility and hopelessness.
Pain is an almost invisible presence. Yet it casts a net
beyond the person who is directly affected. In fact, pain has
never been suffered alone. Family members have always been
aware of the suffering, although limited in their resources to
deal with it. They are affected by the pain of a family member
in a number of ways—emotionally, socially, academically, finan-
cially and spiritually—depending on the family situation of the
person with the bleeding disorder.
“When I’m in pain, I tend to express it by complaining
verbally—to tell the truth, by screaming. My family
doesn’t like to see me suffer and they do their best to
comfort me and distract me. My mother gives me my
Niastase and also morphine for the pain if necessary.
My sister tries to watch TV with me. My father talks to me
about hunting and fishing, which I’m crazy about, and we
often look at magazines together.”
– a 13-year-old boy with a factor IX inhibitor
Families in the bleeding disorder community have
developed ways of dealing with the condition by…
• educating themselves about their particular
situations
• being open in working with the members of
the comprehensive care teams
• learning to do home treatments
• developing internal strengths
• being creative in dealing with problems
• maintaining a sense of hope for the future.
These positive coping abilities now need to be
applied to the new frontier of pain management.
Page 6
4
Roadmap for Managing Pain
PAIN – THE FIFTH VITAL SIGN
Most health care providers and patients are used to having
the four routine vital signs— blood pressure, pulse rate,
temperature and respiratory rate—recorded at every
assessment. Yet the most common reason for seeking medical
care is pain. In 1995, the term, “fifth vital sign”, was coined,
suggesting that that pain must be measured and treated.
What then is pain? A medical definition is: “An
unpleasant sensory and emotional experience associated
with actual or potential tissue damage, or described in terms
of such damage.”
A person with hemophilia, however, describes pain in
these words.
“I experience pain daily. It can be mild or severe. It can
be relentless. It can sometimes be unpredictable.
I associate my pain with an imaginary companion I like to
call the dragon. This dragon travels with me all day,
every day. He makes it his point to remind me when I am
doing something destructive by breathing his heat and
making me uncomfortable. As I like being active, I would
hate to see the trouble I might get into if I could silence
this dragon completely.”
- a 35-year-old man with hemophilia
Pain in hemophilia is usually of two types:
Acute pain is usually due to bleeding into joints and
muscles and, more rarely, the after-effects of surgery.
Chronic pain is associated with joint degeneration or other
long-term complications of hemophilia.
Pain is always subjective—it is the person with pain who
decides if there is pain or not—and always unpleasant. And
it is an emotional experience. When pain becomes chronic,
the actual injury, and even the physiological responses, may
not be visible.
Why assessing and managing pain is so important
There are many roadblocks to the humane and competent
assessment and management of pain.
• Patients and health care providers often differ
culturally and socially.
• Treatment for chronic pain may be unavailable,
unaffordable or not covered by health insurance.
• The variability and unpredictability of pain in people
with bleeding disorders may lead to an adversarial
relationship between patients and health care providers.
Page 7
5
Roadmap for Managing Pain
Recognizing pain as the fifth vital sign puts assessment at
the forefront, and allows the patient and family to create an
alliance with the health care providers against suffering.
The aim of pain control within the first few hours of a
bleeding episode is relief of suffering. Unrelieved pain can
actually interfere with healing and turn acute pain into a
chronic problem.
With chronic pain control there is the added aim of
maintaining daily function. The final goal is a balance
between the efficacy of pain relief, the side effects if any,
and being as functional as possible.
All modalities of pain management—physical,
pharmacological and psychological—should be incorporated
into the therapeutic plan, if beneficial. Then, there is no fear
of the agony of the next episode because the patient can
assume “control”, and knows back-up plans are in place.
Fortunately, there is already a major shift in attitudes
toward pain medications. Not so long ago, there was a
reluctance to prescribe pain killers because they might cause
addiction or interfere with recovery. Research has shown that
the risk of clinical addiction is overestimated and, in fact,
quite rare at the dosages used for pain management. What’s
more, recovery takes place faster when pain is properly
managed.
How pain is measured
Unlike its vital sign counterparts, there is no gadget to
measure pain—it must be evaluated by asking questions
and observing behaviour. These are some helpful tools:
For children aged 3 and older, a range of tools is avail-
able for self-reporting and behaviour observation; children
from approximately age 5 are able to reliably complete a
VAS (Visual Analog Scale) score. One useful tool might be
the “Face Scales”.
Pain has sensory, emotional, motivational, cognitive, and
behavioural dimensions. Hence the individual’s subjective
response must override the clinician’s bias. Every patient
deserves the most effective treatment, not what the
provider feels he/she should have.
Page 8
Roadmap for Managing Pain
6
THE ROLE OF THE COMPREHENSIVE
CARE TEAM IN PAIN MANAGEMENT
In various ways, all of the comprehensive care team
members are involved in the assessment and management
of pain.
The person with the bleeding disorder and, in the case
of a young child, his/her parents, are at the centre of the
process. They need to be able to recognize bleeds early
and know the difference between pain from acute bleeds
and from chronic conditions.
“I now know I have to get treatment as soon as possible
when I think I am bleeding. Sometimes I think I can get
away without treatment and I wait before telling my
mother. This is often how the pain gets very bad…
but not always.”
- an 8-year-old boy with hemophilia
The nurse coordinator can ensure that pain is assessed
and treated by the appropriate team member. In
managing both acute and chronic pain, good bleed diaries
are most helpful. So are pain diaries to record preceding
events, intensity of pain, activity level, interventions and
response to treatment.
The hematologist can develop a management plan for
both acute and chronic pain which could include
medication. If you do not live close to the Hemophilia
Treatment Centre (HTC), your family physician will need to
be involved. In some parts of Canada, HTCs are located in
large health centres, which include pain management
teams whose members have specialized knowledge in the
management of all aspects of pain.
The physiotherapist can make various recommendations
for treating acute or chronic pain. The overall goal is to
prevent secondary complications due to pain, such as tight
musculature or poor mobility.
The social worker can help the patient manage the life
complications that occur due to pain.
Comprehensive care teams in pediatric and adult
centres often have close working relationships with
rheumatology and orthopedic teams whose expertise can
be called upon to treat pain. Treatments such as joint
injections, synovectomies or joint replacements are some
of the options.
People with pain, and their families, need to be aware
that pain is a manageable condition. It doesn’t need to
be suffered in silence.
Discuss it with your
clinic team and work
out a plan that suits
you.
ADVOCATING
Page 9
Roadmap for Managing Pain
7
FOR BETTER PAIN
MANAGEMENT
“My physician told me she never realized how much
pain people with hemophilia had until she went to a
CHS workshop on pain management. She couldn’t
believe how well her patients hid the pain.”
- a 50-year-old man with hemophilia
Advocacy is a process of promoting a cause on behalf of
oneself and/or others. An advocate is someone who works
through that process.
You are your own best advocate but, depending on the sit-
uation, the role of advocate can be played by almost anyone.
•
a family member—spouse, parent or sibling—
or close friend
•
a nurse, especially the nurse at the HTC
•
a physiotherapist
•
a social worker.
The HTC is part of a network of clinics across Canada and
therefore the comprehensive care team has an established net-
work of expertise it can tap into for help in difficult situations.
You may need to seek help from experts in the field of pain
management. It is sometimes difficult to get a referral to a
specialist because many people, including physicians, simply
do not understand the extent of the pain. In addition to the
hematologists at the HTC, a family physician can also facilitate
a referral. It is always preferable to have your family physician
and/or your hematologist working with you. So, in all likeli-
hood, you will need to convince these people of your need for
expert help.
Fatigue, immobility, frustration and anger are common in
patients with chronic pain, making it difficult to communicate.
When pain persists, confidence and respect for health care
professionals can quickly erode.
Effective advocacy can help you communicate competently in
a calm, yet assertive way, working with health care providers to
develop an effective pain management plan.
Effective communication strategies
Take a buddy - A family member or a friend who knows your
situation well can help you to have confidence and to be more
open about your situation.
Prepare ahead - Write down key points before the visit.
Be knowledgeable - Be ready to provide information about
your pain. Use resources such as this booklet to know your
options.
Be proactive - Ask to discuss your pain management. Propose
a solution if you think you have one.
Speak up! Be assertive! - State what the problem is and what
concerns you have. It won’t always help to “grin and bear it”.
Page 10
8
Roadmap for Managing Pain
Listen - Listen carefully to what the physician says. Don’t be
afraid to ask him to explain if you’re not sure you understand.
Stay calm - You may feel frustration and impatience because
of the pain. Staying calm can be difficult, but it is important.
Repeat yourself if necessary - If you find your concerns are not
getting addressed, calmly repeat your problem and insist that
you are serious about finding a solution.
Be polite and courteous, yet firm - The health care providers
are trying to do their jobs to the best of their abilities, but may
have little experience treating chronic pain.
Focus on the problem, not the people - You want relief from
pain—that is the problem at hand. Focus on finding a solu-
tion, and not on any difficulties you are having getting help.
Use “I-statements,” not “you-statements.” - Focus on how you
feel and what you need, not on any disputes with health care
providers.
THE USE OF ANALGESIC
“I never considered myself one to take drugs
to manage pain, at least not in the obvious
sense like taking Tylenol, because I rarely do
this. But I do have a strategy and do in fact take drugs
to manage my pain. I infuse with clotting factor on a
prophylactic basis to prevent bleeds and thereby prevent
episodes of pain. I take Celebrex®, not everyday as I
should, but when I start to feel constant nagging pain
or know that I will be involved in activity the next day.”
- a 35-year-old man with hemophilia
Most patients with acute pain can obtain relief with the
careful use of common drugs such as acetaminophen
(Tylenol®) or non-steroidal anti-inflammatory drugs (NSAIDs).
The new COX-2 inhibitors (Celebrex®, Vioxx®) have less
effect on platelet function than ibuprofen, which was often
used for patients as the NSAID of choice. The addition of opi-
oids, such as morphine, can increase the control of severe
pain, depending on the individual patient.
If oral medication is ineffective, intravenous (IV) therapy is
an option. Opioids can be given by IV bolus, or by continu-
ous administration for even more control.
“At the hospital the pain management team put me on
a pump so I could administer extra doses of morphine
myself when I felt pain. I didn’t have to ask for and
wait to get my painkiller. It was also very useful when I
started to move around again with the help of my phys-
iotherapist. I manage my pain and can do my exercises
better.
- a 13-year-old boy with a factor IX inhibitor
Page 11
9
Roadmap for Managing Pain
Many people worry that opioids are addictive or could
lead to abuse. While there are no guarantees against this,
physicians take all possible precautions. As long as the
amount used is for pain, then the chance of addiction is
quite low. Short-term use for acute bleeds or surgery is
very unlikely to lead to addiction.
Addiction is not the same as tolerance. When people
use opioid pain medication, their bodies become accus-
tomed to the dose. One may need to increase the amount
to get the desired effect. Changing to a different medica-
tion can sometimes avoid the increase.
Poorly treated pain is detrimental to patients. Poor pain
management produces abnormal pain behaviour and may
even cause patients to seek out street drugs because they
are afraid of not being able to manage severe pain.
Marijuana is probably better to reduce nausea, improve
appetite and promote sleeping. Its use must be individual-
ized. For most patients it is not the magic drug. Legal
access to marijuana is difficult.
When the patient is traveling, the physician can provide
a specific letter detailing the medications and the amount
needed. He/she may even set out a suggested plan of
medication for mild and severe bleeds. This will help the
physician in another city to manage the pain. It will also
provide evidence at borders that a person is authorized to
carry these medications.
There are many useful medications for controlling pain.
In all cases, the type of analgesic and the route of adminis-
tration must be tailored to the individual patient. What’s
more, the underlying health problem must be managed by
knowledgeable health care workers.
PHYSIOTHERAPY – ANOTHER
APPROACH TO PAIN MANAGEMENT
The Pain Service at the Hospital for Sick Children always
recommends appropriate exercise to our patients. We
know that exercise makes the body release chemicals,
called endorphins, that not only make us feel less pain,
but also make us feel good. It’s something you can
control and do for yourself.
- Dr. Michael Jeavons, Psychiatrist,
Hospital for Sick Children’s Pain Service
An exercise or fitness program improves…
• Muscle strength - Stronger muscles tire less easily, which
results in extra support and protection for the joint and
reduces the stress and strain that can cause pain.
• Joint range of motion - Improved mobility of the joint
results in better alignment of the joint and decreased stress
on its surrounding structures. Exercises help reduce
stiffness and, by improving movement, may alleviate pain.
Page 12
10
Roadmap for Managing Pain
• Flexibility - Joint contractures and/or muscle
shortening may result in pain. These respond
well to stretching exercises. Improved flexibility
also decreases the chance of muscle bleeds.
• Coordination and balance - The development
of these skills results in a quicker response to a
sudden movement and a decreased chance of
further injury to the joint.
• Confidence and peer acceptance - Exercising
allows sharing with friends. Participation and
success bring confidence.
• Feelings of well-being and decreased anxiety -
Mental stress and anxiety are known to influence
sleep patterns, muscle spasm, the frequency of
bleeds and increase sensitivity to pain. Exercise
can decrease feelings of stress.
• Release of endorphins - Endorphins are natural chemicals
produced by the body and act as a damper to the
sensation of pain. Their production is thought to be
influenced by exercise, heat, cold, positive attitude, some
physiotherapy electrical modalities, relaxation and
medications.
• Endurance and weight loss - Cardio-vascular exercises
increase endurance and strength and therefore reduce
stress on the joints. Weight loss may occur, which also
decreases pressure on the joint surface.
“Sometimes applying ice helps a bit. I have several
orthotics I can use to immobilize the affected joint if
the bleeding is in the joint. I also use crutches or my
wheelchair when I have to. Because I had many
hemorrhages, I didn’t go to school for a few years.
I have been back at school since September 2002 and
I love it. I have a lot less bleeding because I am more
active and my muscles are stronger.”
- a 13-year-old boy with a factor IX inhibitor
A physiotherapist at the HTC can assess the pain and
assist in choosing an exercise or activity program. Ask the
physiotherapist about these other ways to reduce pain.
• Non-electrical treatments such as hot packs, ice,
hydrotherapy, splinting, foot orthotics and acupuncture
• Electrical modalities such as Transcutaneous Electrical
Nerve Stimulation (T.E.N.S.) and ultra-sound
Recommended activities for people who suffer from the
pain of arthritis related to hemophilia are those that have
low impact on the joint but allow mobility, strengthening and
cardio-vascular exercise. They include:
•
swimming and aquacise
•
T’ai Chi
•
yoga
•
bicycling
•
walking, dancing, bowling and hiking.
Page 13
11
Road for Managing Pain
For more information, see the Passport to Well-Being
module entitled: Destination — Fitness.
ORTHOPEDIC AND SURGICAL
MANAGEMENT OF PAIN
Orthopedic interventions can be very effective in managing
pain. Acute pain from recurrent bleeding into target joints can
be helped by procedures such as synovectomy. Chronic pain
from an irrevocably damaged joint can be relieved by
procedures such as joint replacement. All invasive procedures
must be performed under the protection of factor
replacement. The hemophilia doctor must be involved to
ensure that adequate levels of replacement are provided for
the appropriate time post-operatively. Factor replacement
may be recommended prior to post-operative physiotherapy
sessions.
Synovectomy
Removal of the swollen synovium (synovectomy) can
decrease recurrent bleeding into a target joint and
reduce pain. Three techniques can be used:
Radioactive synovectomy - A radioactive isotope is
injected into a target joint. Within the joint, the
radioactivity reduces the amount of swollen synovium.
Arthroscopic synovectomy - Using small surgical
incisions a tiny camera is inserted into a joint to guide the
removal of the synovium through the other incisions. This can
be used for ankles, knees and elbows.
Open synovectomy - The joint is opened surgically and the
synovium removed.
Joint replacements
Chronic joint damage produces pain and decreased range
of motion. When the pain is severe and interferes with the
activities of daily living, joint replacement is an option. Knee
and hip replacements are the most common. Elbow, shoulder
and ankle replacements are done less commonly due to the
complexity of the joints.
Before the elbow replacement in 1999, I was in
tremendous pain continuously for a period of about
8 months to the point of having to stop working.
– a 49-year-old man with hemophilia
The damaged joint and adjacent bone are removed and
replaced with plastic and metal components (knee) or with a
metal ball and a plastic cup (hip). Pain control is critical during
the recovery period so that early mobilization and physiothera-
py can occur. Most people are left with a pain-free joint.
Page 14
Roadmap for Managing Pain
12
Other surgeries
Other surgeries that might be considered to manage pain
from damaged joints are:
• Removal of small bony growths around the joint margins
(cheilectomy)
• Fusion of the joint to leave a painless immobile joint
(arthrodesis)
• Removal of the radial head to improve rotation of the
forearm
• Removal of the ball part of the femur to allow a fibrous
union to develop. This may be done if a hip replace-
ment fails
• Removal of a wedge of bone from the femur or tibia to
realign the leg and reduce pain (osteotomy).
Less invasive options
Injection of a corticosteroid into an affected joint can be
used in the short to medium term to decrease inflammation
and pain. This could be used while awaiting surgery.
“Ultimately, the operations—replacements and
fusions—were godsends and did relieve the pain. I
do not run or skate and I avoid stairs like the plague,
but my wife and I play golf—I still have a slice—and
I am able to enjoy travel and visit family and friends.”
- a 43-year-old man with hemophilia
COMPLEMENTARY AND ALTERNATIVE
APPROACHES TO PAIN MANAGEMENT
“When I’m at home, I find that my dog helps me a lot
to manage my pain. I see a huge difference since he
became part of our lives. ”
- an 8-year-old boy with hemophilia
Complementary and Alternative Health
Care (CAHR) are therapies that are
considered outside of mainstream medical
practices.
A complementary therapy, such as
aromatherapy to help lessen a person’s
discomfort following surgery, is used together with
conventional medicine. In contrast, alternative medicine, such
as a special diet to treat cancer instead of undergoing surgery
that has been recommended by a conventional doctor, is used
in place of conventional medicine.
While there is scientific evidence supporting some CAHC
therapies, for most there remain unanswered questions
regarding safety and effectiveness. As these therapies
become better understood and validated with sound scientific
research, some CAHC therapies will become integrated into
traditional medicine.
Page 15
Roadmap for Managing Pain
13
Types of complementary and alternative health care therapies
CAHR therapies can be divided into five categories, or
domains:
• Alternative medical systems including homeopathy,
naturopathy, traditional Chinese medicine and
Ayurveda
• Mind-body interventions including patient
support groups, meditation, prayer, biofeedback,
humour therapy, and therapies that use creative
outlets such as art, music or dance
• Biologically-based therapies using substances
found in nature, such as herbs, foods, and
vitamins
• Manipulative and body-based methods
including chiropractic or osteopathic manipulation,
reflexology and massage
• Energy therapies including qi gong, Reiki and
Therapeutic Touch.
The value of complementary and alternative health care
therapies in reducing pain
It is important to ask yourself what you expect from CAHC
therapies. While you may not be able to find relief for your
pain, some CAHC therapies may be able to provide you with
indirect benefits.
Consider the potential benefits before starting a treatment.
Monitor how you feel as a result of the treatment. Then make
a decision about whether to continue it.
The safety of complementary and alternative health care
therapies
To protect yourself from potential risks involved when using
CAHC therapies, be sure to:
• Discuss all of your CAHC practices with your physician
and other health care providers. Ensure the therapy you
are considering will be safe when taking into account your
current health status.
• Try to gather information from sources that look at both
sides of a therapy—those who oppose and those who
support the therapy. Consult publications and web sites
that stem from governments, recognized medical
organizations, well-known scientific sources or academic
institutions.
• Be cautious about any of the claims that you come
across.
• Seek out only fully competent and licensed practitioners.
Ask individuals about their training and experience. Check
with provincial or territorial Ministries of Health.
Page 16
Roadmap for Managing Pain
14
Some CAHC products contain powerful pharmacological
substances which can be toxic on their own, or when used
with other medications. Some can affect the ability of your
blood to clot. This is especially dangerous for a person with a
bleeding disorder. Some substances known to negatively
affect clotting are…
•
black cohosh
•
cat’s claw
•
feverfew
•
garlic
•
ginkgo biloba
•
pau d’arco.
CONCLUSION
For many, the pain of acute bleeding is the most vivid
memory of living with a bleeding disorder. Thanks to better
treatment, such episodes are much rarer today, but still a
reality, especially for those with an inhibitor. The long-term
consequences of bleeding, however, mean that many adults
are living with damaged joints and
the burden of chronic pain. For
many years, this pain went largely
unrecognized or was accepted as
unavoidable. Today, we know a
roadmap for pain management
must be drawn so that people can
find their way to some relief.
RESOURCES
1. Pain – The Fifth Vital Sign, Canadian Hemophilia Society, 2004,
www.hemophilia.ca
2. The Pain Management Book for People with Haemophilia and Related
Bleeding Disorders, Hemophilia Foundation Australia and the World
Federation of Hemophilia, Treatment of Hemophilia Series, Number 22,
April 2000, www.wfh.org
3. All About Hemophilia – A Guide for Families, Canadian Hemophilia Society,
2001, www.hemophilia.ca
4. Hemophilia Today, Canadian Hemophilia Society, www.hemophilia.ca
5. Handbook for Physical Activity Guide, Health Canada, www.hc-sc.gc.ca
6. Health Canada’s Office of Natural Health Products, www.hc-sc.gc.ca
7. Canadian Health Network, funded by Health Canada, www.canadian-health-
network.ca
8. Canadian Health Portal, links to provincial or territorial Ministries of Health,
www.pcs-chp.gc.ca
9. NCCAM, the U.S. Federal Government’s lead agency for scientific research
on complementary and alternative medicine, www.nccam.nih.gov
Sunday, August 24, 2008
Saturday, August 23, 2008
Saturday, March 29, 2008
BACK CARE PILATES EXERCISE
BACK CARE: PILATES EXERCISE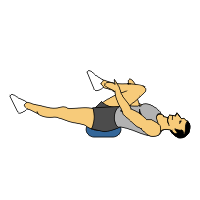

Pilates is another great exercise for relieving back pain because it focuses on strengthening your core muscles, which include the back.
Pilates exercises are very smooth and controlled movements, so there is little danger of getting injured while exercising. It’s also a great way work on your strength and flexibility, both of which help to alleviate back pain. . One of the best benefits of Pilates is that it helps improve posture, a common cause of lower back pain.
The following Pilates exercises benefit the spine and are appropriate for beginners. Do each exercise slowly and smoothly, and repeat ten times if you can. The key to pilates is quality of exercise, not quantity; it is more important to do fewer exercises slowly and correctly than to do all ten repetitions quickly.
THE HUNDRED:
Start by lying on your back with your legs either stretched out or bent at the knees, whichever is most comfortable. Raise your head and, if you can, your legs off the floor a few inches. If this puts too much stress on your lower back, just raise your head and keep your feet on the floor with your knees bent. Try to keep your neck relaxed. Now extend your arms, and raise and lower them about two inches. While doing this, inhale for a count of five and exhale for a count of five.
SPINE STR ETCH FORWARD:
Sit with legs extended in front of you and slightly more than hip width apart and feet flexed. Inhale and pretend that you are hovering over an imaginary beach ball by leaning your upper body forward, arms extended, while rounding your back and pulling in your abdomen. Exhale as you sit back up slowly one vertebra at a time.

The ROLLUP:
Begin by lying on your back, legs extended, and arms stretched above your head with your shoulders on the floor. Alternately, you may want to do this exercise with your feet on the floor, knees bent. Inhale
and lift your arms toward the ceiling. Exhale and roll your torso forward, as if you are doing a full body sit-up. You should ideally roll into a sitting position, but if you can’t, just bring your torso as far off the mat as you comfortably can before returning to your starting position.
 The SAW: Sit with your legs slightly wider than hip width, feet flexed. Your arms should be extended straight out to the side. Sit up very straight as if you are trying to touch the ceiling with the top of your head. Exhale; turn your body to the left, keeping your arms in line with your shoulders, and bend over as if your hand is going to saw off your little toe. Inhale, return slowly to your original position, and repeat on the other side.

SPINE TWIST: Sit with your legs slightly more than hip width apart and your arms extended out to the sides. Inhale, tighten your abs, and sit up very straight as if you are trying to touch your head to the ceiling. Now exhale and turn to the right as far as you comfortably can. This exercise is to increase your back mobility only, so do not stretch your back muscles. Inhale and return to your starting position. Repeat on the left side.
 Leg Circle with fit band
1. Start by lying on your back and placing a band around the foot that is pointed towards the ceiling.
2. Holding the other end of the band with your hands allow your leg to fall towards the side.
3. Once your leg reaches the side then bring it back up to the top and let your leg fall toward the other foot.
4. Bring your leg back up and finish by shifting the leg to the other side.
5. Return to the starting position and repeat.

Pilates Saw on Stability Ball
1. Sit on stability ball with your legs straight and your arms outstretched to the side.
2. Rotate and twist your trunk so that your right hand reaches and touches your left foot.
3. Return to t he starting position and repeat to the other side.
Prone Single Leg Kick
1. Lie face down on the floor and legs straight.
2. Slowly curl one leg up until your foot hits your hip.
3. Return to the starting position and repeat with the other side.
 Scissors
1) Start position: Straighten both legs so that they are perpendicular to floor.
2) Slowly lower one leg to approximately 45°.
3) Return to start position and repeat.
4) Remember to maintain stability in lower back throughout movement by keeping abdominal muscles contracted - DO NOT ARCH LOWER BACK. To increase intensity, lower legs past 45° without touching floor as long as trunk stability is maintained
Thursday, March 20, 2008


CPGs:
Many of them are rhythmic movements such as breathing, chewing, and walking. These movements are produced by neural circuits called central pattern generators
When activated, the neurons in these circuits generate a certain pattern of predetermined neural activity that smoothly co-ordinates the contraction of the many muscles involved in rhythmic activities such as walking.
These pattern generators free up your conscious mind so that you don't have to send down a voluntary command every time you want to put one foot in front of the other. In this respect, walking resembles a reflex activity. But you do have to issue voluntary commands when you want to start or stop walking, just as you do to pick up your pace to get across the street when the light turns yellow, or to make that little jump up to the curb on the opposite side, or a small sidestep to avoid a puddle along the way.
Thus voluntary commands can also modulate certain reflex movements. This is the most effective compromise that nature has found between the need to free our minds from repetitive movements and the need to retain some ability to adjust to changes and obstacles in our environment.
Location of different networks (central pattern generators, CPGs) that coordinate different motor patterns in vertebrates.
The spinal cord contains the CPGs for locomotion and protective reflexes
the brainstem, those for breathing, chewing, swallowing and saccadic eye movements;
the hypothalamus, centres that regulate eating and drinking.
These areas can coordinate the activation of different CPGs in a behaviourally relevant order. For instance, if the fluid intake area is activated, an animal will look for water, walk towards it, position itself and start drinking. The cerebral cortex is important in particular for fine motor coordination involving hands and fingers and for speech. General control strategy for vertebrate locomotion. Locomotion is initiated by activity in reticulospinal neurons (RS) of the brainstem locomotor centre, which produces the locomotor pattern in close interaction with sensory feedback. With increased activation of the locomotor centre, the speed of locomotion increases and interlimb coordination can change (from a walk to a gallop, for example
The basal ganglia exert a tonic inhibitory influence on motor centres that is released when a motor pattern is selected.
ACTIVE CYCLE OF BREATHING(ACBT)


What is a Active Cycle of Breathing Techniques?
The Active cycle of breathing techniques (ACBT) is a simple pattern of breathing to -
loosen and clear secretions
improve ventilation
This leaflet is intended to remind you what you were taught by your Physiotherapist.
The parts of the ACBT are -
This is normal gentle breathing using the lower chest, with relaxation of the upper chest and shoulders. It helps you to relax between the deep breathing and huffing.
Deep breathing :
These are slow deep breaths in followed by relaxed breaths out. 3 - 4 deep breaths are enough.
Huffing :
This is a medium sized breath in, followed by a fast breath out through an open mouth, using the muscles of the chest and stomach to force the breath out.
This will move secretions along the airways to a point where you can cough them up.
Coughing :
This should follow 2 - 3 huffs OR a deep breath in.
Don't cough unless secretions are ready to be cleared.
Active cycle of breathing :
This is a flexible technique and can be varied to suit you
In what position should I practice this breathing technique?
You can use this method of breathing in whatever position you find is most comfortable, or seems to clear most secretions, for example, sitting in a chair, lying on your side, or 'tipped' if this helps.
What other techniques can use with the Active Cycle of Breathing (ACBT)?
It is often beneficial to 'hold' for a second or two at the end of one or all of the deep breaths.
If your physiotherapist advises, you (or a helper) can 'clap' your chest while you breathe out.
How often should spend doing it?
If you have a chronic respiratory condition but you are very well, 10 minutes will be long enough to ventilate your lungs and clear any secretions.
You can do it as long as you are clearing any secretions but 20 minutes is usually long enough for any one treatment.
If you have an infection and your cough is more productive than usual, you will need to practice the cycle more often during the day.
Good luck - this is one very positive way that you can influence your own health.

Wednesday, March 19, 2008

Definition:
Chest physiotherapy (CPT) is a technique used to mobilize or loose secretions in the lungs and respiratory tract. This is especially helpful for patients with large amount of secretions or ineffective cough. Chest physiotherapy consists of external mechanical maneuvers, such as chest percussion, postural drainage, vibration, to augment mobilization and clearance of airway secretions, diaphragmatic breathing with pursed-lips, coughing and controlled coughing
Chest physiotherapy (CPT) is a technique used to mobilize or loose secretions in the lungs and respiratory tract. This is especially helpful for patients with large amount of secretions or ineffective cough. Chest physiotherapy consists of external mechanical maneuvers, such as chest percussion, postural drainage, vibration, to augment mobilization and clearance of airway secretions, diaphragmatic breathing with pursed-lips, coughing and controlled coughing
CHESTPHYSIO-HANDS ON TECHNIQUE 1.Anatomy and physiology of respiratory system :Our lungs are the main organs of the respiratory system. The lungs are located inside the upper part of our chest on either side of the heart, and they are protected by the ribcage. The breastbone (sternum) is at the center front of the chest, and the spine is at the center of the back of the chest. The inside of the chest cavity and the outside of the lungs are covered by the pleura, a slippery membrane that allows the lungs to move smoothly as they fill up with and empty out air when we inhale and exhale. Normally, there is a small amount of lubricating fluid between the two layers of the pleura. This helps the lungs glide inside the chest as they change size and shape during breathing.2.Air moves through the body in the following order: Nostrils Nasal cavity Pharynx (naso-, oro-, laryngo-) Larynx (voice box) Trachea (wind pipe) Thoracic cavity (chest) Bronchi (right and left) Alveoli (site of gas exchange)The trachea leads down to the thoracic cavity (chest) where it divides into the right and left “main stem” bronchi. The subdivisions of the bronchus are: primary, secondary, and tertiary divisions (first, second and third levels). In all, they divide 16 more times into even smaller bronchioles. The bronchioles lead to the respiratory zone of the lungs, which consists of respiratory bronchioles, alveolar ducts and the alveoli, the multi-lobulated sacs in which most of the gas exchange occurs.The right lung is composed of three lobes: the upper lobe, the middle lobe and the lower lobe.The left lung is made up of only two lobes: the upper lobe and the lower lobe.The lobes are divided into smaller divisions called segments. The upper lobes on the left and right sides are each made up of three segments: apical, posterior and anterior. The left upper lobe includes the lingual, which corresponds to the middle lobe on the right. The lower lobes each include four segments: superior, anterior, basal, lateral basal and posterior basal. Each segment of the lung contains a network of air tubes, air sacs and blood vessels. These sacs allow for the exchange of oxygen and carbon dioxide between the blood and air. It is these segments that are being drained.3.Ventilation:Inhalation:Inhalation is initiated by the diaphragm and supported by the external intercostal muscles. Normal resting respirations are 10 to 18 breaths per minute. Its time period is 2 seconds. Inhalation is primarily driven by the diaphragm and accessory muscles. When the diaphragm contracts, the ribcage expands and the contents of the abdomen are moved downward. This results in a larger thoracic volume, which in turn causes a decrease in intrathoracic pressure. As the pressure in the chest falls, air moves into the conducting zone. Here, the air is filtered, warmed, and humidified as it flows to the lungs4.Exhalation:Exhalation is generally a passive process, however active or forced exhalation is achieved by the abdominal and the internal intercostal muscles. The lungs have a natural elasticity; as they recoil from the stretch of inhalation, air flows back out until the pressures in the chest and the atmosphere reach equilibrium. During forced exhalation, as when blowing out a candle, expiratory muscles including the abdominal muscles and internal intercostal muscles, generate abdominal and thoracic pressure, which forces air out of the lungs.Gas exchange:5.The major function of the respiratory system is gas exchange. Upon inhalation, gas exchange occurs at the alveoli, the tiny sacs which are the basic functional component of the lungs. The alveolar walls are extremely thin, and are permeable to gases. The alveoli are lined with pulmonary capillaries, the walls of which are also thin enough to permit gas exchange. All gases diffuse from the alveolar air to the blood in the pulmonary capillaries, as carbon dioxide diffuses in the opposite direction, from capillary blood to alveolar air. At this point, the pulmonary blood is oxygen-rich, and the lungs are holding carbon dioxide. Exhalation follows, thereby ridding the body of the carbon dioxide and completing the cycle of respiration. In an average resting adult, the lungs take up about 250ml of oxygen every minute while excreting about 200ml of carbon dioxide. During an average breath, an adult will exchange from 500 ml to 700 ml of air. This, average breath capacity is called tidal volume.6.Indications:It is indicated for patients in whom cough is insufficient to clear thick, tenacious, or localized secretions. Examples include:• Cystic fibrosis• Bronchiectasis• Atelctasis• Lung abscess• Neuromuscular diseases• Pneumonias in dependent lung regions.7.Contraindications are relative and include:• Increased ICP• Unstable head or neck injury• Active hemorrhage with hemodynamic instability or hemoptysis• Recent spinal injury or injury• Empyma• Bronchoplueral fistula• Rib fracture• Fail chest• Uncontrolled hypertension• Anticoagulation• Rib or vertebral fractures or osteoporosis8.Assessment for Chest Physiotherapy and selection of CPT skills are based on specific assessment findings.:The following are the assessment criteria:• Know the normal range of patient’s vital signs. Conditions requiring CPT, such atelectasis, and pneumonia, affects vital signs.• Know the patient’s medications. Certain medications, particularly diuretics antihypertensive cause fluid and haemodynamic changes. These decrease patient’s tolerance to positional changes and postural drainage.• Know the patient’s medical history; certain conditions such as increased ICP, spinal cord injuries and abdominal aneurysm resection, contra indicate the positional change to postural drainage. Thoracic trauma and chest surgeries also contraindicate percussion and vibration.• Know the patient’s cognitive level of functioning. Participating in controlled cough techniques requires the patient to follow instructions. • Beware of patient’s exercise tolerance. CPT maneuvers are fatiguing. Gradual increase in activity and through CPT, patient tolerance to the procedure improves.9.Clinical findings and investigations determines the position of applying proceduresDetailed HistoryPhysical examination• Inspection• Palpation• Percussion• Auscultation10.Investigations X-ray Blood investigations-bleeding and clotting parameters11.Techniques in Chest Physiotherapy a respiratory therapist may administer CPT:the techniques can often be taught to family members of patients. The most common procedures used are postural drainage and chest percussion, in which the patient is rotated to facilitate drainage of secretions from a specific lobe or segment while being clapped with cupped hands to loosen and mobilize retained secretions that can then be expectorated or drained. The procedure is somewhat uncomfortable and tiring for the patient.a.Percussion:Chest percussion involves striking the chest wall over the area being drained. Percussing lung areas involves the use of cupped palm to loosen pulmonary secretions so that hey can be expectorated with ease. Percussing with the hand held in a rigid dome-shaped position, the area over the lung lobes to be drained in struck in rhythmic pattern. Usually the patient will be positioned in supine or prone and should not experience any pain. Cupping is never done on bare skin or performed over surgical incisions, below the ribs, or over the spine or breasts because of the danger o tissue damage. Typically, each area is percussed for 30 to 6oseconds several times a day. If the patient has tenacious secretions, the area must be percussed for 3-5 minutes several times per day. Patients may learn how to percuss the anterior chest as well.b.Vibration:In vibration, the nurse uses rhythmic contractions and relaxations is or her arm and shoulder muscles while holding thee patient flat on the patient’s chest as the patient exhales. The purpose is to help loosen respiratory secretions so that they can be expectorated with ease. Vibration (at a rate of 200 per minute) can be done for several times a day. To avoid patient causing discomfort, vibration is never done over the patient’s breasts, spine, sternum, and rib cage. Vibration can also be taught to family members or accomplished with mechanical device.Procedure: Percussion & Vibration1. Instruct the patient use diaphragmatic breathing2. Position the patient in prescribed postural drainage positions. Spine should be straight to promote rib cage expansion3. Percuss or clap with cupped hands or chest wall for 5 minutes over each segment for 5 minutes for cystic fibrosis and 1-2 minutes for other conditions4. Avoid clapping over spine, liver, spleen, breast, scapula, clavicle or sternum5. Instruct the patient to inhale slowly and deeply. Vibrate the chest wall as the patient exhales slowly through the pursed lips.• Place one hand on top of the other affected over area or place one hand place one and on each side of the rib cage.• Tense the muscles of the hands and hands while applying moderate pressure downward and vibrate arms and hands• Relieve pressure on the thorax as the patient inhales.• Encourage the patient cough, using abdominal muscles, after three or four vibrations.6. Allow the patient rest several times7. Listen with stethoscope for changes in breath sounds8. Repeat the percussion and vibration cycle according to the patient’s tolerance and clinical response: usually 15-30 minutes.c.Postural Drainage:Postural drainage is the positioning techniques that drain secretions from specific segments of the lugs and bronchi into the trachea. Because some patients do not require postural drainage for all lung segments, the procedure must be based on the clinical findings. In postural drainage, the person is tilted or propped at an angle to help drain secretions from the lungs. Also, the chest or back may be clapped with a cupped hand to help loosen secretions—the technique called chest percussion.Postural drainage cannot be used for people who are unable to tolerate the position required, are taking anticoagulation drugs, have recently vomited up blood, have had a recent rib or vertebral fracture, or have severe osteoporosis. Postural drainage also cannot be used for people who are unable to produce any secretions (because when this happens, further attempts at postural drainage may lower the level of oxygen in the blood).Procedure:The patient’s body is positioned so that the trachea is inclined downward and below the affected chest area. Postural drainage is essential in treating bronchiectasis and patients must receive physiotherapy to learn to tip themselves into a position in which the lobe to be drained is uppermost at least three times daily for 10-20 minutes. The treatment is often used in conjunction with the technique for loosening secretions in the chest cavity called chest percussion.12.Articles required:#Pillows,#Tilt table,#Sputum cup,#Paper tissues.Steps:1. Use specific positions so the force of gravity can assist in the removal of bronchial secretions from affected lung segments to central airways by means of coughing and suctioning.step:2. The patient is positioned so that the diseased area is in a near vertical position, and gravity is used to assist the drainage of specific segment.step:3. The positions assumed are determined by the location, severity, and duration of mucous obstructionstep:4. The exercises are performed two to three times a day, before meals and bedtime. Each position is done for 3-15 minutesstep:5. The procedure should be discontinued if tachycardia, palpitations, dyspnea, or chest occurs. The se symptoms may indicate hypoxemia. Discontinue if hemoptysis occurs.step:6. Bronchodilators, mucolytics agents, water, or saline may be nebulised and inhaled before postural drainage and chest percussion to reduce bronchospasm, decrease thickness of mucus and sputum, and combat edema of the bronchial walls, there by enhancing secretion removalstep:7. Perform secretion removal procedures before eatingstep:8. Make sure patient is comfortable before the procedure starts and as comfortable as possible he or she assumes each positionstep:9. Auscultate the chest to determine the areas of needed drainagestep:10. Encourage the patient to deep breathe and cough after spending the allotted time in each position.step:11. Encourage diaphragmatic breathing through out postural drainage: this helps widen airways so secretions can be drainedPositionsADULT Lung segment Position recommendedBilateral-High Fowler’s#Apical-right upper lobe-anterior segment-Sitting on side of the bedSupine with head elevated#Left upper lobe-anterior Supine with head elevated#Right upper lobe-posterior Side-lying with right side of the chest elevated on pillows#Left upper lobe-posterior Side-lying with left side of the chest elevated on pillows#Right Middle lobe-anterior segment Three-fourth supine position with dependent lung in Trendelenburg’s position#Right Middle lobe-posterior segment Prone with thorax and abdomen elevated#Both lower lobes-anterior segments Supine in Trendelenburg’s position#Left lower lobe lateral position Right side-lying in Trendelenburg’s position#Right lower lobe-lateral segment Left side-lying in Trendelenburg’s position#Right lower lobe-posterior segment Prone with right side of chest elevated in Trendelenburg’s position#Both lower lobes-posterior segment Prone in Trendelenburg’s positionCHILD #Bilateral-Apical segments Sitting on therapist lap, leaning slightly forward flexed over pillow.#Bilateral-middle anterior segments Sitting on therapist lap, leaning against nurse#Bilateral- anterior segments Lying supine on therapist lap, back supported with pillow.13.Complications:Complications are unusual but include:• position-related hypoxia • aspiration of secretions in other lung regions• hypotension14.Coughing : coughing gently or making short grunting noises with the mouth slightly open will help loosen the mucus Do this periodically throughout the drainage procedure.Controlled Coughing Technique Controlled coughing is one of the essential techniques in good respiratory care. Patient perform this maneuver after each drainage position and often throughout the day. The abdominal muscles are very powerful muscles used in coughing and exhaling. Inhale deeply through the nose. Pause. Cough 2 to 3 sharp staccato cough with proper hand/arm placement. Breathe in easily through the nose.14.Conclusion:Chest physiotherapy is an effective procedure in chronic pulmonary disorders. This is especially helpful for patients with large amount of secretions or ineffective cough.
CPT CHEST WALL COORDINATIONMuscular movement is seldom as a result of a single muscle moving in one direction. Muscles act together in groups, that support the activity of one another in a coordinated and synergistic manner. Much of that coordination and synergism of breathing has been lost in the development of the "Barrel Chest" deformity of COPD.As noted previously, much of the abnormal COPD chest movement is the stiff upward "Unit Movement" involving the "Pump Handle" action. And because of the overinflated positioning and chest stiffening of the lower chest, the crucial "Bucket Handle" movement is now minimal, which results in a failure to provide synergistic support for the all important movement of the diaphragm. Remember, the diaphragm is the major muscle of breathing, and restoring its function as much as possible is the major objective of chest physiotherapy. This is why this type of therapy is generaly known as "Diaphragm Breathing Exercises" or "Diaphragmatic Breathing Training" or just Diaphragmatic Breathing."To provide the crucial synergistic support from the lower rib cage structures for optimal diaphragm movement the "Bucket Handle" movement must be restored. To achieve this, the focus of your inspiratory breath must be on the lowest-lateral ribs, at a point directly below the anterior portion of your arm pits. Placing your hands, or having an assistant place their hands in the correct position (as shown in the diagrams in the last section) is helpful in getting started. You should try to feel these lower ribs moving outward, and also try to feel air moving into this region. After some initial practice you should be able to perform this chest movement naturally, and without needing to have hand placement to remind you. And as your ribs become more mobile with Belt Exercises you will find this easier to do, and with improved rib excursions.And what about teaching specific diaphragm movement? Well, this is what you are doing by learning correct Bucket Handle rib movement. Remember, the diaphragm and the rib cage muscles performing the Bucket Handle movement act as a synergistic muscle group. By activating the Bucket Handle movement, the diaphragm movement will naturally follow.Note the synergistic progressive flow of muscular group movement here. First is the rib cage Bucket Handle movement, and then soon after the upper abdomen begins to rise due to diaphragm movement into the abdomen. At this juncture, do not attempt to puff your upper belly out to aid inspiration. Continue to focus on the Bucket Handle movement, and the abdomen will rise on it's own with further diaphragm movement.UPPER CHEST MOVEMENTAnd what about reducing the abnormal upper chest movement? Almost always that movement will gradually go away if you simply maintain focus on the lower rib, Bucket Handle movement. I do not advocate, and in fact discourage the popular "Two Hand Technique," with one hand on the upper chest (to encourage minimal movement) and the other hand on the central upper abdomen (to encourage maximal diaphragm movement). As we have seen earlier, this technique unfortunately tends to teach the abnormal trick movement of Belly Puffing.However, with very large breaths you will note the upper chest now moving upward. This is normal, as you are now activating the so-called "Accessory Breathing Muscles" driving the "Pump Handle" movement. This is a normal emergency breathing movement to provide maximal breathing. It can be easily seen as the "heaving" upper chest of an athlete who has just finished an exhausting race. Think of this movement as an emergency breathing reserve, to be encouraged. However, it is important to maintain focus on the lower Bucket Handle movement as is the dominant movement. Let the upper chest movement flow from the lower Bucket Handle movement.Note the synergist flow of muscle group activity. First the lower chest Bucket Handle movement, then the abdomen rises with diaphragm activity. Then, with larger breaths there is more Bucket Handle movement and more diaphragm activity and a further rise of the abdomen, and the upper chest now starts to rise with Pump Handle movement.UPPER CHEST MOVEMENT MOVEMENT WITH ANXIETYThe "Pump Handle" upper chest movement is basically a defensive, emergency type of breathing. This is probably how it became ingrained as part of the abnormal "Unit Movement" of the "Barrel Chest" deformity.However, it is very interesting to note, that anxiety will frequently trigger this type of upper chest movement, and it does so both in people with with COPD as well as those with perfectly normal lungs. Presumably this is because tension and anxiety is part of the overall defensive, emergency reaction.In distressed patients with COPD having an acute dyspnea attack it may be impossible to tell if upper chest movement is at least partially due to this anxiety based type of breathing. Most likely most such upper chest movement in this situation is a part of a desirable muscular recruitment to assist breathing (i.e. due to deranged pulmonary mechanics resulting from Dynamic Hyperinflation). To resolve this problem it is best to focus on the lower chest "Bucket Handle" movement, and if in doubt about residual upper chest movement, try to voluntarily limit the upper chest movement.Some people will immediately display upper chest breathing when starting the Rescue Breathing Pattern. These people should immediately try to limit upper chest breathing, while at the same time calming themselves.In people with normal lungs suffering an anxiety attack or "Panic Attack" and an overbreathing condition known as the "Hyperventilation Syndrome" will frequently exhibit a heaving upper chest manner of breathing. The link between acute anxiety and this type of breathing seems so compelling, that many therapists make elimination of upper chest movement a priority in reducing anxiety and establishing breathing control.EXPIRATION CONTROLAnd what about expiration? Expiration is mainly about timing of the length of breathing out. Generally speaking, expiration should be entirely relaxed and passive, to allow sufficient time for the air to get out, and also permit rest of the respiratory muscles. However, if you do need to provide some muscular force to exhale, it is best done by gently tightening the upper abdominal muscles, and from there there will flow some exhalation activity to the lower ribs. Remember, if you need to forcefully exhale, do it as gently as possible, in order to minimize any "Dynamic Bronchial Compression," which will make the airways smaller, and therefore impair air flow. More on this subject later.RESPIRATORY MUSCLE STRENGTHENINGThe rib muscles of breathing, having been encased in the stiffened Barrel Chest deformity, have undergone at least some measure of atrophy and weakness. And unfortunately, when liberated from the stiff Barrel Chest they initially may be so weak they tire very easily. Most patients will gradually improve this muscle strength with increased activity made possible by breathing control, and progress well with their rehabilitation process. However, occasionally some initial post chest mobilization muscular strengthening is needed to speed the rehabilitation process. If so, a modification of the Breathing Belt technique can be used for this purpose.To strengthen the rib muscles, perform the Belt Exercise as noted above. However, instead of suddenly releasing the belt and allowing the chest wall to spring out, gradually release the belt tension as you inhale, and force the expanding chest to work a bit. This requires a little practice to do properly, as maintaining a steady pressure as the chest moves out on inspiration is a subtle skill. Initially the pressure applied should be gentle. And as your strength improves, increase the inspiration belt tension until you are using a firm tension and working fairly hard to breathe in. These strengthening exercises should be done only two or three times a day, and never more than five minutes at a time. The amount of fatigue you feel at the end of this exercise will be your indicator as to whether or not you should increase of decrease the amount of belt tension.Another useful option are the commercial "Inspiratory Muscle Training (IMT)" devices. These simple devices are quite economical. Your doctor will need to prescribe one for you, and if so, be sure to get a so-called "threshold" training device. The inspiration pressure needs to be set, and start with about 10 to 15 cm water pressure, and gradually work up to between 30 and preferably 40 cm water pressure. Some advocate using these devices for 15, 20 or even 30 minutes 3 or 4 times a day. I believe these are excessively prolonged, unpleasant, and unnecessary exercise sessions. Again, as with belt exercises I would suggest that your exercise sessions with these IMT devices be limited to five minutes, and only two or at most three times a day.The RESPIRATORY SQUEEZEThe Respiratory Squeeze is basically an exaggerated Breathing Belt exercise. The object is to squeeze as much air out of your lungs as possible, in preparation for a better inspiration breath. The method can be used for rapid lung decompression of an overinflated lung causing an acute attack of dyspnea. And it may also be used to advantage in clearing retained bronchial mucus (phlegm) as part of the "Huff Cough" technique. More on this aspect in another module.The Respiratory Squeeze is performed in the sitting position, with the knees touching. The Breathing Belt technique is then done as described above, but with a longer time spent on expiration, at least four or five or more times longer than your usual exhalation time.However, instead of maintaining an upright posture, lean your body forward on expiration as you are applying belt pressure. As you near the end of expiration your hands should now be together in the center of your upper abdomen, and by leaning against your legs, your hands will assist in pushing your diaphragm upward for enhanced lung emptying. Then, on inspiration release the belt pressure and simultaneously return your body to the upright position, and feel the air rush in.For correction of even severe lung overinflation, properly done, only one or two Respiratory Squeezes should be needed. For clearing stubborn sticky retained phlegm, repeating a Respiratory Squeeze before each Huff Cough maneuver can be very helpful.
Subscribe to:
Posts (Atom)