Saturday, March 29, 2008

BACK CARE PILATES EXERCISE

BACK CARE: PILATES EXERCISE

Pilates is another great exercise for relieving back pain because it focuses on strengthening your core muscles, which include the back.

Pilates exercises are very smooth and controlled movements, so there is little danger of getting injured while exercising. It’s also a great way work on your strength and flexibility, both of which help to alleviate back pain. . One of the best benefits of Pilates is that it helps improve posture, a common cause of lower back pain.

The following Pilates exercises benefit the spine and are appropriate for beginners. Do each exercise slowly and smoothly, and repeat ten times if you can. The key to pilates is quality of exercise, not quantity; it is more important to do fewer exercises slowly and correctly than to do all ten repetitions quickly.

THE HUNDRED:

Start by lying on your back with your legs either stretched out or bent at the knees, whichever is most comfortable. Raise your head and, if you can, your legs off the floor a few inches. If this puts too much stress on your lower back, just raise your head and keep your feet on the floor with your knees bent. Try to keep your neck relaxed. Now extend your arms, and raise and lower them about two inches. While doing this, inhale for a count of five and exhale for a count of five.

SPINE STRETCH FORWARD:

Sit with legs extended in front of you and slightly more than hip width apart and feet flexed. Inhale and pretend that you are hovering over an imaginary beach ball by leaning your upper body forward, arms extended, while rounding your back and pulling in your abdomen. Exhale as you sit back up slowly one vertebra at a time.


The ROLLUP:
Begin by lying on your back, legs extended, and arms stretched above your head with your shoulders on the floor. Alternately, you may want to do this exercise with your feet on the floor, knees bent. Inhale
and lift your arms toward the ceiling. Exhale and roll your torso forward, as if you are doing a full body sit-up. You should ideally roll into a sitting position, but if you can’t, just bring your torso as far off the mat as you comfortably can before returning to your starting position.


The SAW: Sit with your legs slightly wider than hip width, feet flexed. Your arms should be extended straight out to the side. Sit up very straight as if you are trying to touch the ceiling with the top of your head. Exhale; turn your body to the left, keeping your arms in line with your shoulders, and bend over as if your hand is going to saw off your little toe. Inhale, return slowly to your original position, and repeat on the other side.


SPINE TWIST: Sit with your legs slightly more than hip width apart and your arms extended out to the sides. Inhale, tighten your abs, and sit up very straight as if you are trying to touch your head to the ceiling. Now exhale and turn to the right as far as you comfortably can. This exercise is to increase your back mobility only, so do not stretch your back muscles. Inhale and return to your starting position. Repeat on the left side.


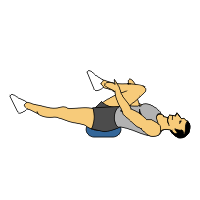
Leg Circle with fit band
1. Start by lying on your back and placing a band around the foot that is pointed towards the ceiling.
2. Holding the other end of the band with your hands allow your leg to fall towards the side.
3. Once your leg reaches the side then bring it back up to the top and let your leg fall toward the other foot.
4. Bring your leg back up and finish by shifting the leg to the other side.
5. Return to the starting position and repeat.


Pilates Saw on Stability Ball
1. Sit on stability ball with your legs straight and your arms outstretched to the side.
2. Rotate and twist your trunk so that your right hand reaches and touches your left foot.
3. Return to t
he starting position and repeat to the other side.


Prone Single Leg Kick
1. Lie face down on the floor and legs straight.
2. Slowly curl one leg up until your foot hits your hip.
3. Return to the starting position and repeat with the other side.


Scissors
1) Start position: Straighten both legs so that they are perpendicular to floor.
2) Slowly lo
wer one leg to approximately 45°.
3) Return to start position and repeat.
4) Remember to maintain stability in lower back throughout movement by keeping abdominal muscles contracted - DO NOT ARCH LOWER BACK. To increase intensity, lower legs past 45° without touching floor as long as trunk stability is maintained
Thursday, March 20, 2008

CENTRAL PATTERN GENERATORS IN SPINAL CORD


CPGs:


Many of them are rhythmic movements such as breathing, chewing, and walking. These movements are produced by neural circuits called central pattern generators


When activated, the neurons in these circuits generate a certain pattern of predetermined neural activity that smoothly co-ordinates the contraction of the many muscles involved in rhythmic activities such as walking.


These pattern generators free up your conscious mind so that you don't have to send down a voluntary command every time you want to put one foot in front of the other. In this respect, walking resembles a reflex activity. But you do have to issue voluntary commands when you want to start or stop walking, just as you do to pick up your pace to get across the street when the light turns yellow, or to make that little jump up to the curb on the opposite side, or a small sidestep to avoid a puddle along the way.


Thus voluntary commands can also modulate certain reflex movements. This is the most effective compromise that nature has found between the need to free our minds from repetitive movements and the need to retain some ability to adjust to changes and obstacles in our environment.


Location of different networks (central pattern generators, CPGs) that coordinate different motor patterns in vertebrates.


The spinal cord contains the CPGs for locomotion and protective reflexes


the brainstem, those for breathing, chewing, swallowing and saccadic eye movements;


the hypothalamus, centres that regulate eating and drinking.


These areas can coordinate the activation of different CPGs in a behaviourally relevant order. For instance, if the fluid intake area is activated, an animal will look for water, walk towards it, position itself and start drinking. The cerebral cortex is important in particular for fine motor coordination involving hands and fingers and for speech. General control strategy for vertebrate locomotion. Locomotion is initiated by activity in reticulospinal neurons (RS) of the brainstem locomotor centre, which produces the locomotor pattern in close interaction with sensory feedback. With increased activation of the locomotor centre, the speed of locomotion increases and interlimb coordination can change (from a walk to a gallop, for example


The basal ganglia exert a tonic inhibitory influence on motor centres that is released when a motor pattern is selected.


ACTIVE CYCLE OF BREATHING(ACBT)


What is a Active Cycle of Breathing Techniques?
The Active cycle of breathing techniques (ACBT) is a simple pattern of breathing to -
loosen and clear secretions
improve ventilation
This leaflet is intended to remind you what you were taught by your Physiotherapist.
The parts of the ACBT are -
This is normal gentle breathing using the lower chest, with relaxation of the upper chest and shoulders. It helps you to relax between the deep breathing and huffing.
Deep breathing :
These are slow deep breaths in followed by relaxed breaths out. 3 - 4 deep breaths are enough.
Huffing :
This is a medium sized breath in, followed by a fast breath out through an open mouth, using the muscles of the chest and stomach to force the breath out.
This will move secretions along the airways to a point where you can cough them up.
Coughing :
This should follow 2 - 3 huffs OR a deep breath in.
Don't cough unless secretions are ready to be cleared.
Active cycle of breathing :
This is a flexible technique and can be varied to suit you
In what position should I practice this breathing technique?
You can use this method of breathing in whatever position you find is most comfortable, or seems to clear most secretions, for example, sitting in a chair, lying on your side, or 'tipped' if this helps.
What other techniques can use with the Active Cycle of Breathing (ACBT)?
It is often beneficial to 'hold' for a second or two at the end of one or all of the deep breaths.
If your physiotherapist advises, you (or a helper) can 'clap' your chest while you breathe out.
How often should spend doing it?
If you have a chronic respiratory condition but you are very well, 10 minutes will be long enough to ventilate your lungs and clear any secretions.
You can do it as long as you are clearing any secretions but 20 minutes is usually long enough for any one treatment.
If you have an infection and your cough is more productive than usual, you will need to practice the cycle more often during the day.
Good luck - this is one very positive way that you can influence your own health.

Wednesday, March 19, 2008


Definition:
Chest physiotherapy (CPT) is a technique used to mobilize or loose secretions in the lungs and respiratory tract. This is especially helpful for patients with large amount of secretions or ineffective cough. Chest physiotherapy consists of external mechanical maneuvers, such as chest percussion, postural drainage, vibration, to augment mobilization and clearance of airway secretions, diaphragmatic breathing with pursed-lips, coughing and controlled coughing
CHESTPHYSIO-HANDS ON TECHNIQUE 1.Anatomy and physiology of respiratory system :Our lungs are the main organs of the respiratory system. The lungs are located inside the upper part of our chest on either side of the heart, and they are protected by the ribcage. The breastbone (sternum) is at the center front of the chest, and the spine is at the center of the back of the chest. The inside of the chest cavity and the outside of the lungs are covered by the pleura, a slippery membrane that allows the lungs to move smoothly as they fill up with and empty out air when we inhale and exhale. Normally, there is a small amount of lubricating fluid between the two layers of the pleura. This helps the lungs glide inside the chest as they change size and shape during breathing.2.Air moves through the body in the following order: Nostrils  Nasal cavity  Pharynx (naso-, oro-, laryngo-)  Larynx (voice box)  Trachea (wind pipe)  Thoracic cavity (chest)  Bronchi (right and left)  Alveoli (site of gas exchange)The trachea leads down to the thoracic cavity (chest) where it divides into the right and left “main stem” bronchi. The subdivisions of the bronchus are: primary, secondary, and tertiary divisions (first, second and third levels). In all, they divide 16 more times into even smaller bronchioles. The bronchioles lead to the respiratory zone of the lungs, which consists of respiratory bronchioles, alveolar ducts and the alveoli, the multi-lobulated sacs in which most of the gas exchange occurs.The right lung is composed of three lobes: the upper lobe, the middle lobe and the lower lobe.The left lung is made up of only two lobes: the upper lobe and the lower lobe.The lobes are divided into smaller divisions called segments. The upper lobes on the left and right sides are each made up of three segments: apical, posterior and anterior. The left upper lobe includes the lingual, which corresponds to the middle lobe on the right. The lower lobes each include four segments: superior, anterior, basal, lateral basal and posterior basal. Each segment of the lung contains a network of air tubes, air sacs and blood vessels. These sacs allow for the exchange of oxygen and carbon dioxide between the blood and air. It is these segments that are being drained.3.Ventilation:Inhalation:Inhalation is initiated by the diaphragm and supported by the external intercostal muscles. Normal resting respirations are 10 to 18 breaths per minute. Its time period is 2 seconds. Inhalation is primarily driven by the diaphragm and accessory muscles. When the diaphragm contracts, the ribcage expands and the contents of the abdomen are moved downward. This results in a larger thoracic volume, which in turn causes a decrease in intrathoracic pressure. As the pressure in the chest falls, air moves into the conducting zone. Here, the air is filtered, warmed, and humidified as it flows to the lungs4.Exhalation:Exhalation is generally a passive process, however active or forced exhalation is achieved by the abdominal and the internal intercostal muscles. The lungs have a natural elasticity; as they recoil from the stretch of inhalation, air flows back out until the pressures in the chest and the atmosphere reach equilibrium. During forced exhalation, as when blowing out a candle, expiratory muscles including the abdominal muscles and internal intercostal muscles, generate abdominal and thoracic pressure, which forces air out of the lungs.Gas exchange:5.The major function of the respiratory system is gas exchange. Upon inhalation, gas exchange occurs at the alveoli, the tiny sacs which are the basic functional component of the lungs. The alveolar walls are extremely thin, and are permeable to gases. The alveoli are lined with pulmonary capillaries, the walls of which are also thin enough to permit gas exchange. All gases diffuse from the alveolar air to the blood in the pulmonary capillaries, as carbon dioxide diffuses in the opposite direction, from capillary blood to alveolar air. At this point, the pulmonary blood is oxygen-rich, and the lungs are holding carbon dioxide. Exhalation follows, thereby ridding the body of the carbon dioxide and completing the cycle of respiration. In an average resting adult, the lungs take up about 250ml of oxygen every minute while excreting about 200ml of carbon dioxide. During an average breath, an adult will exchange from 500 ml to 700 ml of air. This, average breath capacity is called tidal volume.6.Indications:It is indicated for patients in whom cough is insufficient to clear thick, tenacious, or localized secretions. Examples include:• Cystic fibrosis• Bronchiectasis• Atelctasis• Lung abscess• Neuromuscular diseases• Pneumonias in dependent lung regions.7.Contraindications are relative and include:• Increased ICP• Unstable head or neck injury• Active hemorrhage with hemodynamic instability or hemoptysis• Recent spinal injury or injury• Empyma• Bronchoplueral fistula• Rib fracture• Fail chest• Uncontrolled hypertension• Anticoagulation• Rib or vertebral fractures or osteoporosis8.Assessment for Chest Physiotherapy and selection of CPT skills are based on specific assessment findings.:The following are the assessment criteria:• Know the normal range of patient’s vital signs. Conditions requiring CPT, such atelectasis, and pneumonia, affects vital signs.• Know the patient’s medications. Certain medications, particularly diuretics antihypertensive cause fluid and haemodynamic changes. These decrease patient’s tolerance to positional changes and postural drainage.• Know the patient’s medical history; certain conditions such as increased ICP, spinal cord injuries and abdominal aneurysm resection, contra indicate the positional change to postural drainage. Thoracic trauma and chest surgeries also contraindicate percussion and vibration.• Know the patient’s cognitive level of functioning. Participating in controlled cough techniques requires the patient to follow instructions. • Beware of patient’s exercise tolerance. CPT maneuvers are fatiguing. Gradual increase in activity and through CPT, patient tolerance to the procedure improves.9.Clinical findings and investigations determines the position of applying proceduresDetailed HistoryPhysical examination• Inspection• Palpation• Percussion• Auscultation10.Investigations X-ray Blood investigations-bleeding and clotting parameters11.Techniques in Chest Physiotherapy a respiratory therapist may administer CPT:the techniques can often be taught to family members of patients. The most common procedures used are postural drainage and chest percussion, in which the patient is rotated to facilitate drainage of secretions from a specific lobe or segment while being clapped with cupped hands to loosen and mobilize retained secretions that can then be expectorated or drained. The procedure is somewhat uncomfortable and tiring for the patient.a.Percussion:Chest percussion involves striking the chest wall over the area being drained. Percussing lung areas involves the use of cupped palm to loosen pulmonary secretions so that hey can be expectorated with ease. Percussing with the hand held in a rigid dome-shaped position, the area over the lung lobes to be drained in struck in rhythmic pattern. Usually the patient will be positioned in supine or prone and should not experience any pain. Cupping is never done on bare skin or performed over surgical incisions, below the ribs, or over the spine or breasts because of the danger o tissue damage. Typically, each area is percussed for 30 to 6oseconds several times a day. If the patient has tenacious secretions, the area must be percussed for 3-5 minutes several times per day. Patients may learn how to percuss the anterior chest as well.b.Vibration:In vibration, the nurse uses rhythmic contractions and relaxations is or her arm and shoulder muscles while holding thee patient flat on the patient’s chest as the patient exhales. The purpose is to help loosen respiratory secretions so that they can be expectorated with ease. Vibration (at a rate of 200 per minute) can be done for several times a day. To avoid patient causing discomfort, vibration is never done over the patient’s breasts, spine, sternum, and rib cage. Vibration can also be taught to family members or accomplished with mechanical device.Procedure: Percussion & Vibration1. Instruct the patient use diaphragmatic breathing2. Position the patient in prescribed postural drainage positions. Spine should be straight to promote rib cage expansion3. Percuss or clap with cupped hands or chest wall for 5 minutes over each segment for 5 minutes for cystic fibrosis and 1-2 minutes for other conditions4. Avoid clapping over spine, liver, spleen, breast, scapula, clavicle or sternum5. Instruct the patient to inhale slowly and deeply. Vibrate the chest wall as the patient exhales slowly through the pursed lips.• Place one hand on top of the other affected over area or place one hand place one and on each side of the rib cage.• Tense the muscles of the hands and hands while applying moderate pressure downward and vibrate arms and hands• Relieve pressure on the thorax as the patient inhales.• Encourage the patient cough, using abdominal muscles, after three or four vibrations.6. Allow the patient rest several times7. Listen with stethoscope for changes in breath sounds8. Repeat the percussion and vibration cycle according to the patient’s tolerance and clinical response: usually 15-30 minutes.c.Postural Drainage:Postural drainage is the positioning techniques that drain secretions from specific segments of the lugs and bronchi into the trachea. Because some patients do not require postural drainage for all lung segments, the procedure must be based on the clinical findings. In postural drainage, the person is tilted or propped at an angle to help drain secretions from the lungs. Also, the chest or back may be clapped with a cupped hand to help loosen secretions—the technique called chest percussion.Postural drainage cannot be used for people who are unable to tolerate the position required, are taking anticoagulation drugs, have recently vomited up blood, have had a recent rib or vertebral fracture, or have severe osteoporosis. Postural drainage also cannot be used for people who are unable to produce any secretions (because when this happens, further attempts at postural drainage may lower the level of oxygen in the blood).Procedure:The patient’s body is positioned so that the trachea is inclined downward and below the affected chest area. Postural drainage is essential in treating bronchiectasis and patients must receive physiotherapy to learn to tip themselves into a position in which the lobe to be drained is uppermost at least three times daily for 10-20 minutes. The treatment is often used in conjunction with the technique for loosening secretions in the chest cavity called chest percussion.12.Articles required:#Pillows,#Tilt table,#Sputum cup,#Paper tissues.Steps:1. Use specific positions so the force of gravity can assist in the removal of bronchial secretions from affected lung segments to central airways by means of coughing and suctioning.step:2. The patient is positioned so that the diseased area is in a near vertical position, and gravity is used to assist the drainage of specific segment.step:3. The positions assumed are determined by the location, severity, and duration of mucous obstructionstep:4. The exercises are performed two to three times a day, before meals and bedtime. Each position is done for 3-15 minutesstep:5. The procedure should be discontinued if tachycardia, palpitations, dyspnea, or chest occurs. The se symptoms may indicate hypoxemia. Discontinue if hemoptysis occurs.step:6. Bronchodilators, mucolytics agents, water, or saline may be nebulised and inhaled before postural drainage and chest percussion to reduce bronchospasm, decrease thickness of mucus and sputum, and combat edema of the bronchial walls, there by enhancing secretion removalstep:7. Perform secretion removal procedures before eatingstep:8. Make sure patient is comfortable before the procedure starts and as comfortable as possible he or she assumes each positionstep:9. Auscultate the chest to determine the areas of needed drainagestep:10. Encourage the patient to deep breathe and cough after spending the allotted time in each position.step:11. Encourage diaphragmatic breathing through out postural drainage: this helps widen airways so secretions can be drainedPositionsADULT Lung segment Position recommendedBilateral-High Fowler’s#Apical-right upper lobe-anterior segment-Sitting on side of the bedSupine with head elevated#Left upper lobe-anterior Supine with head elevated#Right upper lobe-posterior Side-lying with right side of the chest elevated on pillows#Left upper lobe-posterior Side-lying with left side of the chest elevated on pillows#Right Middle lobe-anterior segment Three-fourth supine position with dependent lung in Trendelenburg’s position#Right Middle lobe-posterior segment Prone with thorax and abdomen elevated#Both lower lobes-anterior segments Supine in Trendelenburg’s position#Left lower lobe lateral position Right side-lying in Trendelenburg’s position#Right lower lobe-lateral segment Left side-lying in Trendelenburg’s position#Right lower lobe-posterior segment Prone with right side of chest elevated in Trendelenburg’s position#Both lower lobes-posterior segment Prone in Trendelenburg’s positionCHILD #Bilateral-Apical segments Sitting on therapist lap, leaning slightly forward flexed over pillow.#Bilateral-middle anterior segments Sitting on therapist lap, leaning against nurse#Bilateral- anterior segments Lying supine on therapist lap, back supported with pillow.13.Complications:Complications are unusual but include:• position-related hypoxia • aspiration of secretions in other lung regions• hypotension14.Coughing : coughing gently or making short grunting noises with the mouth slightly open will help loosen the mucus Do this periodically throughout the drainage procedure.Controlled Coughing Technique Controlled coughing is one of the essential techniques in good respiratory care.  Patient perform this maneuver after each drainage position and often throughout the day.  The abdominal muscles are very powerful muscles used in coughing and exhaling. Inhale deeply through the nose. Pause. Cough 2 to 3 sharp staccato cough with proper hand/arm placement. Breathe in easily through the nose.14.Conclusion:Chest physiotherapy is an effective procedure in chronic pulmonary disorders. This is especially helpful for patients with large amount of secretions or ineffective cough.
CPT CHEST WALL COORDINATIONMuscular movement is seldom as a result of a single muscle moving in one direction. Muscles act together in groups, that support the activity of one another in a coordinated and synergistic manner. Much of that coordination and synergism of breathing has been lost in the development of the "Barrel Chest" deformity of COPD.As noted previously, much of the abnormal COPD chest movement is the stiff upward "Unit Movement" involving the "Pump Handle" action. And because of the overinflated positioning and chest stiffening of the lower chest, the crucial "Bucket Handle" movement is now minimal, which results in a failure to provide synergistic support for the all important movement of the diaphragm. Remember, the diaphragm is the major muscle of breathing, and restoring its function as much as possible is the major objective of chest physiotherapy. This is why this type of therapy is generaly known as "Diaphragm Breathing Exercises" or "Diaphragmatic Breathing Training" or just Diaphragmatic Breathing."To provide the crucial synergistic support from the lower rib cage structures for optimal diaphragm movement the "Bucket Handle" movement must be restored. To achieve this, the focus of your inspiratory breath must be on the lowest-lateral ribs, at a point directly below the anterior portion of your arm pits. Placing your hands, or having an assistant place their hands in the correct position (as shown in the diagrams in the last section) is helpful in getting started. You should try to feel these lower ribs moving outward, and also try to feel air moving into this region. After some initial practice you should be able to perform this chest movement naturally, and without needing to have hand placement to remind you. And as your ribs become more mobile with Belt Exercises you will find this easier to do, and with improved rib excursions.And what about teaching specific diaphragm movement? Well, this is what you are doing by learning correct Bucket Handle rib movement. Remember, the diaphragm and the rib cage muscles performing the Bucket Handle movement act as a synergistic muscle group. By activating the Bucket Handle movement, the diaphragm movement will naturally follow.Note the synergistic progressive flow of muscular group movement here. First is the rib cage Bucket Handle movement, and then soon after the upper abdomen begins to rise due to diaphragm movement into the abdomen. At this juncture, do not attempt to puff your upper belly out to aid inspiration. Continue to focus on the Bucket Handle movement, and the abdomen will rise on it's own with further diaphragm movement.UPPER CHEST MOVEMENTAnd what about reducing the abnormal upper chest movement? Almost always that movement will gradually go away if you simply maintain focus on the lower rib, Bucket Handle movement. I do not advocate, and in fact discourage the popular "Two Hand Technique," with one hand on the upper chest (to encourage minimal movement) and the other hand on the central upper abdomen (to encourage maximal diaphragm movement). As we have seen earlier, this technique unfortunately tends to teach the abnormal trick movement of Belly Puffing.However, with very large breaths you will note the upper chest now moving upward. This is normal, as you are now activating the so-called "Accessory Breathing Muscles" driving the "Pump Handle" movement. This is a normal emergency breathing movement to provide maximal breathing. It can be easily seen as the "heaving" upper chest of an athlete who has just finished an exhausting race. Think of this movement as an emergency breathing reserve, to be encouraged. However, it is important to maintain focus on the lower Bucket Handle movement as is the dominant movement. Let the upper chest movement flow from the lower Bucket Handle movement.Note the synergist flow of muscle group activity. First the lower chest Bucket Handle movement, then the abdomen rises with diaphragm activity. Then, with larger breaths there is more Bucket Handle movement and more diaphragm activity and a further rise of the abdomen, and the upper chest now starts to rise with Pump Handle movement.UPPER CHEST MOVEMENT MOVEMENT WITH ANXIETYThe "Pump Handle" upper chest movement is basically a defensive, emergency type of breathing. This is probably how it became ingrained as part of the abnormal "Unit Movement" of the "Barrel Chest" deformity.However, it is very interesting to note, that anxiety will frequently trigger this type of upper chest movement, and it does so both in people with with COPD as well as those with perfectly normal lungs. Presumably this is because tension and anxiety is part of the overall defensive, emergency reaction.In distressed patients with COPD having an acute dyspnea attack it may be impossible to tell if upper chest movement is at least partially due to this anxiety based type of breathing. Most likely most such upper chest movement in this situation is a part of a desirable muscular recruitment to assist breathing (i.e. due to deranged pulmonary mechanics resulting from Dynamic Hyperinflation). To resolve this problem it is best to focus on the lower chest "Bucket Handle" movement, and if in doubt about residual upper chest movement, try to voluntarily limit the upper chest movement.Some people will immediately display upper chest breathing when starting the Rescue Breathing Pattern. These people should immediately try to limit upper chest breathing, while at the same time calming themselves.In people with normal lungs suffering an anxiety attack or "Panic Attack" and an overbreathing condition known as the "Hyperventilation Syndrome" will frequently exhibit a heaving upper chest manner of breathing. The link between acute anxiety and this type of breathing seems so compelling, that many therapists make elimination of upper chest movement a priority in reducing anxiety and establishing breathing control.EXPIRATION CONTROLAnd what about expiration? Expiration is mainly about timing of the length of breathing out. Generally speaking, expiration should be entirely relaxed and passive, to allow sufficient time for the air to get out, and also permit rest of the respiratory muscles. However, if you do need to provide some muscular force to exhale, it is best done by gently tightening the upper abdominal muscles, and from there there will flow some exhalation activity to the lower ribs. Remember, if you need to forcefully exhale, do it as gently as possible, in order to minimize any "Dynamic Bronchial Compression," which will make the airways smaller, and therefore impair air flow. More on this subject later.RESPIRATORY MUSCLE STRENGTHENINGThe rib muscles of breathing, having been encased in the stiffened Barrel Chest deformity, have undergone at least some measure of atrophy and weakness. And unfortunately, when liberated from the stiff Barrel Chest they initially may be so weak they tire very easily. Most patients will gradually improve this muscle strength with increased activity made possible by breathing control, and progress well with their rehabilitation process. However, occasionally some initial post chest mobilization muscular strengthening is needed to speed the rehabilitation process. If so, a modification of the Breathing Belt technique can be used for this purpose.To strengthen the rib muscles, perform the Belt Exercise as noted above. However, instead of suddenly releasing the belt and allowing the chest wall to spring out, gradually release the belt tension as you inhale, and force the expanding chest to work a bit. This requires a little practice to do properly, as maintaining a steady pressure as the chest moves out on inspiration is a subtle skill. Initially the pressure applied should be gentle. And as your strength improves, increase the inspiration belt tension until you are using a firm tension and working fairly hard to breathe in. These strengthening exercises should be done only two or three times a day, and never more than five minutes at a time. The amount of fatigue you feel at the end of this exercise will be your indicator as to whether or not you should increase of decrease the amount of belt tension.Another useful option are the commercial "Inspiratory Muscle Training (IMT)" devices. These simple devices are quite economical. Your doctor will need to prescribe one for you, and if so, be sure to get a so-called "threshold" training device. The inspiration pressure needs to be set, and start with about 10 to 15 cm water pressure, and gradually work up to between 30 and preferably 40 cm water pressure. Some advocate using these devices for 15, 20 or even 30 minutes 3 or 4 times a day. I believe these are excessively prolonged, unpleasant, and unnecessary exercise sessions. Again, as with belt exercises I would suggest that your exercise sessions with these IMT devices be limited to five minutes, and only two or at most three times a day.The RESPIRATORY SQUEEZEThe Respiratory Squeeze is basically an exaggerated Breathing Belt exercise. The object is to squeeze as much air out of your lungs as possible, in preparation for a better inspiration breath. The method can be used for rapid lung decompression of an overinflated lung causing an acute attack of dyspnea. And it may also be used to advantage in clearing retained bronchial mucus (phlegm) as part of the "Huff Cough" technique. More on this aspect in another module.The Respiratory Squeeze is performed in the sitting position, with the knees touching. The Breathing Belt technique is then done as described above, but with a longer time spent on expiration, at least four or five or more times longer than your usual exhalation time.However, instead of maintaining an upright posture, lean your body forward on expiration as you are applying belt pressure. As you near the end of expiration your hands should now be together in the center of your upper abdomen, and by leaning against your legs, your hands will assist in pushing your diaphragm upward for enhanced lung emptying. Then, on inspiration release the belt pressure and simultaneously return your body to the upright position, and feel the air rush in.For correction of even severe lung overinflation, properly done, only one or two Respiratory Squeezes should be needed. For clearing stubborn sticky retained phlegm, repeating a Respiratory Squeeze before each Huff Cough maneuver can be very helpful.
The aim of postural drainage is to to allow gravity to assist drainage of respiratory secretions. There are 11 different positions which are based on the anatomy of the bronchial tree and are aimed at draining particular lobes or lung segments. Postural drainage may be used in conjunction with other techniques, e.g.the active cycle of breathing techniques, the forced expiration technique with or without percussion, positive expiratory pressure (PEP) and flutter.
The right lung is divided into three lobes (right upper lobe, right middle lobe and right lower lobe) while the left lung has only two lobes (left upper lobe and lower lobe). The figure below shows the individual segments which make up each lobe.

Click on picture to split lung into lobes. Right upper lobe Apical segment (1) Posterior segment (2) Anterior segment (3) Right middle lobe Lateral segment (4) Medial segment (5) Right lower lobe Superior segment (6) Anterior basal segment (7) lateral basal segment (8) posterior basal segment (9) medial basal segment (10)

Click on picture to split lung into lobes. Left upper lobe (superior division) Apico-posterior segment (11,12)
Anterior segment (13)
Left upper lobe (lingular division) Superior segment (14)
Inferior segment (15)

Left lower lobe
Superior segment (16)
Posterior basal segment (17)
Lateral basal segment (18)
Antero-medial basal segment (19)